Monday, June 29, 2015

Drink This- Bastardette's Iced Coffee

Coffee is important, unless you're some kind of monster.

I need coffee the way a fantasy book protagonist needs a sidekick named "Sam."  Sure, I can last a day or two but so help me if I don't get it back soon, that third day will end like...a truly upsetting season finale. (See what I did there?) 

Coffee is funny stuff, though. Hot coffee is good, and iced coffee is great, but somehow tepid coffee tastes like DESPAIR IN A CUP. Getting a mouthful of room temperature sadness when you're expecting steamy hot ambrosia is worse than finding raisins in your chocolate chip cookie. So here's what you do with that depressing 1/4 cup of joe that you let go to room temperature because you were too absorbed reading SAGA or binge watching mildly embarrassing things on netflix (It was Buffy, wasn't it? It's ok, we've all been there).

See this? Make this.
They're coffee ice cubes. Yes, they do look unfortunate and no amount of natural light or photo editing will change that, BUT you keep these around so you can do three things:

1) Use up that last inch left in the coffee pot. You know, the stuff no one drinks because it's "meh."
2) Temperature control for when that first cup of caffeinated goodness needs to be in your system faster than a shot of adrenaline to Uma Thurman's chest. (Pulp Fiction is still relevant, yes?)
3) You make this with it
Might as well have a rainbow coming out of it.

OK Step 1) Fill up a frosty glass with your sad looking coffee cubes.


Add a glob of this stuff. You probably have some from that time you thought you'd make candy for a Christmas party, but brought vodka instead.


Shoo your dumb, but well meaning cat out of the way. A lot of people forget this step, but it's pretty important. 


Now put some other stuff in it. BOOM.
I usually just add milk, or more of that room temperature coffee I was sad about earlier.


I don't know why I even own raspberry extract, but hey I threw some in. It tasted like freedom.

Lazy iced coffee is great. Put cream and sugar in there. You deserve it because you thought about working out yesterday! Hell, pour a shot 'o booze in that puppy. I'm not your mom. Use up that soy milk you bought because someone convinced you that "clean eating" was real for about 2 seconds. Stir it up! Put it in your face! You'll be glad you did.

Or you can pay the sad teenager at the bookstore cafe to make one for you. I won't judge.


Wednesday, June 24, 2015

I Love Textures! Braided Cable Crochet Stitch Tutorial- By Brazen Jester


Well, hey there! Thanks for checking out my very first post on Attack the Craft!. I’m kind of a dork, so I’m very, very excited to be here, and very excited to be talking about crochet!

I’ve really fallen in love with this craft since I picked it up last summer. It’s relatively simple to pick up, affordable to get into, and most importantly, you can create some remarkable texture with just a few basic stitches! How cool is that?

Today we’re going to be talking about one of my absolute favorite textures: the Braided Crochet Stitch. It’s very similar to a cable crochet, but with an extra step. I personally love using really chunky yarn with this stitch. Even people several feet away can see how awesome and crafty you are! In my experience, this looks best with a lighter yarn (but still looks great with something darker!), so that you can really see the shadows created by all that depth.


 Seriously, just look at all that gorgeous texture!

You will need to possess some basic knowledge in order to do this with relative ease:

l  Double Crochet Stitch
l  Triple Crochet Stitch
l  Front- and Back- post Stitching.

There are many wonderful resources available to learn these stitches, both online and in books; however, I would be more than happy to write a post or two on the basic how-to’s if someone requests it.

You will need some basic materials to get started:

l  Yarn of your choosing
l  A crochet hook of the appropriate size. (You’ll find a hook size suggestion on the packaging of your yarn, most likely)
l  Scissors
l  A large embroidery or darning needle. (The eye should be large enough to thread your yarn through)

Step 1: Make your chain. It should be a multiple of 8+4. For the practice pictures, I started with a chain of 20.

Step 2: Turn, and double crochet across. The last two stitches in your chain count as your first double stitch.

Step 3: Turn, Chain 2. This counts as your first double crochet.


Step 4: Back-post double crochet (bpdc) the next stitch. This will add some lovely depth to your work, so that everyone can really see all that texture we’re going for.


[Sorry, I know this one is a little blurry. I’m a newbie at this.]

Step 5: Skip the next two stitches, and front-post triple crochet (fptc) the third stitch from your bpdc.


Step 6: Fptc the next stitch.


Step 7: Remember those two stitches you skipped? Go back to them. Fptc them in order, over top of the two fptc you completed in steps 5 and 6.


Step 8: Skip to the next two stitches that have not been crocheted in this row. Front Post double crochet (fpdc) both.


Step 9: Bpdc the next two stitches. Again, this is to give depth to the cables you are working so hard to create!


Step 10: Repeat steps 5-9 to finish the row. Turn and chain 2. This counts as your first dc.


Step 11: Working on the back is exactly the same as working on the front, except that all of your front posts become back posts, and vice versa. Fpdc the next stitch.


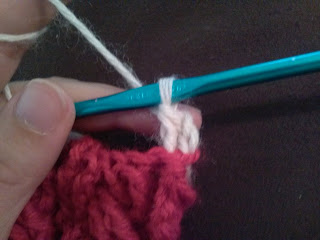
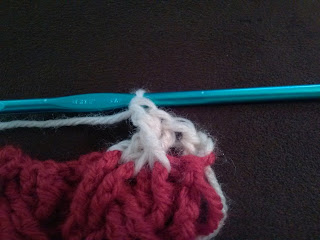
Step 12: Skip the next two stitches. Bptc the two that follow.


Step 13: Return to the first stitch that you skipped. Bptc this stitch, making sure that it lays over the last two stitches that you did.

Can’t really see much from this side, I know, but it’s hiding back there, I promise!


 If you look at the flip side of your work, you’ll be able to see the stitch much better. Right where it should be!

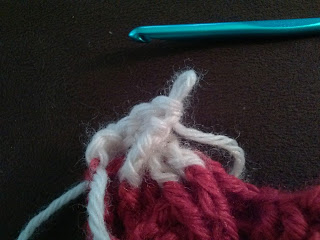
Step 14: Bptc the next skipped stitch.

Again, can’t see much from this side

This is what you’ll see on the flip.

Step 15: Bpdc the next two stitches.


Step 16: Fpdc the next two stitches.

View from your current side.


And from the front.

Step 17: Repeat steps 12-16 to complete your row.

Step 18: Continue adding rows until your project is the length that you desire.

Step 19: When you have finished, chain 2 and turn your work. Dc across.

Step 20: Chain 1 and turn. Sc across. Fasten off. Weave in your ends.

Step 21: Admire your work. You did great!

 For real, that depth and texture can’t be beat!]


Now that you’ve practiced, go and make yourself something fabulous! Don’t forget to post pictures in the comments to show off what you’ve made!

Why You Should Let Knitting Ruin Your Life

I first started knitting roughly a year ago, thanks to my mother in law. We were watching a particularly campy episode of Mystery Science Theater 3000. The one where plenty of action/punching/sexy things happen, but somehow none of them furthers any kind of plot whatsoever. (Yeah I know I pretty much just described all of them.) Great stuff!

She just looked so content clicking away with those needles, while joyfully mocking this festering pustule of a movie. One year later and knitting has taken over my life. So here are some pros and cons about one of my favorite art forms.


Pro:
Learning is easy! There are so many wonderful videos on youtube that will have you casting on stitches in no time!


Con: Learning is hard. First there's knitting, but then you have to learn purling, which is basically backwards knitting, and yes you will have to learn it eventually. Knitting patterns read like hieroglyphics. Your first projects will be lumpy and unfortunate. There will be times when you want to tear your hair out. Luckily, the internet is here to save you.

Pro: You'll never look at knitwear the same again! You won't be able to help closely admiring every beautiful hat, sweater or sock that you see! You'll tsk tsk at the price of that chunky infinity scarf, because you know you could make something better.  And OH MY GOD THE YARN! How come you never noticed how amazing and squishy it is? Go ahead. Treat yourself to that hand spun lace weight alpaca yarn you've been eyeballing. You'll be so happy you did!


 Attack of the Craft Etsy shop! - (Shameless self promotion! WOOO!)

Con: This becomes the equivalent of a crack den. Flying Fibers


Pro: Eventually those knitting patterns will start to make sense, and you'll knit all the beautiful things! Your closet will be full of snuggly garments, and suddenly cold weather won't suck as much as it used to, because at least you'll get to show off your skills!

Con: You will get bored halfway through projects, so you'll start new projects. Your unfinished knitting will pile up in every corner of your home, like this:
I call this piece "The Back of the Couch" 

Pro: Knitters are awesome! They come from all walks of life, and they hang out at cute little yarn shops and cafe's and of course, online! They make jokes about their balls (of yarn)!

Con: Non-knitters will be baffled. "Why must you bring that half knitted sock to the restaurant? You do NOT need to knit every time you sit down!" Lies. All lies.

Pro: Knitting increases your chances of meeting adorable wooly creatures! LOOK AT THIS BABY GOAT IN A SWEATER.

Con: You will quit your job and buy a ranch so you can live with alpacas, because OH MY GOD LOOK AT THEIR FLOOFY HEADS! ...Actually come to think of it, there's nothing "con" about this.


Pro: You can sell your knits! People will be in awe of your skills and fork over their hard earned cash to own one of your handmade accessories!

Con: You will spend that money on more yarn. The addiction is REAL.

Pro: Eventually you might even take up a spinning class at your local yarn shop! Yaay! It's so much fun, and you'll be supporting a great local business, like Flying Fibers! Flying Fibers Classes


Con: That spinning class will make you want to make your own yarn, and oh crap you just saw how much spinning wheels cost. You will start second guessing the quality of the yarn you already own. Suddenly it all seems so...sub par.

Pro: You will be so awesome at gift giving. Everyone will love you. Your cat will love you.


Con: If they don't wear them, you will resent them for it. Don't they know how much time it took to make that?? DID THEY JUST THROW IT IN THE WASHING MACHINE? F*&K! Non-knitters will also ask you to make things for them. They will expect these things to be free.

Pro: Angora bunnies will become your favorite animal. They're so cute and fluffy and you can SPIN RIGHT OFF THE BUNNY!


Con: There's no con here. Bunnies are awesome.